

Two years ago I saw a photo of a fun and clever jellyfish costume made from an umbrella, and ever since then I wanted to make one myself. Unfortunately, however, I’m typically waiting till the last minute to even pick a costume (and this one definitely required some research and planning).
But this year I got ahead of the game! (Read as: I decided to do it the same week I was supposed to wear it, and luckily this time I happened to have a couple nights free.)
Alright, I’ll be honest, I didn’t just have these random craft supplies sitting around my house. I went to my local craft store and Amazon to find the pieces I needed. But theoretically, YOU could already have (most of) the pieces for this Halloween costume in YOUR supplies, because you are crafty like that. Good job, you.
If not, that’s okay – this is a really impressive costume and it may be justifiable to splurge a little if you have a special event at which to wear it. (Just be careful, otherwise you’ll end up spending more than expected, as you will see I did.)
SUPPLIES
Here’s are the pieces I selected for my jellyfish Halloween costume below. As with crafting, adventures in cooking, and income taxes you don’t necessarily need to follow the guide “to the letter” if you feel like being creative or thrifty. (Just kidding about taxes.)

Umbrella – I picked this clear, dome umbrella from Amazon for $18 because it had the exact look I was going for. The transparency allows the lights inside to show through and the dome looks a lot like the shape of the jellyfish “bell”.

Semi-translucent fabric – I selected a white, soft, gauzy netting from my local craft store and bought 3-4 yards for $10. This was used to go over the umbrella to soften the clear plastic and metal of the umbrella and form the billowy “bell” of the jellyfish body.
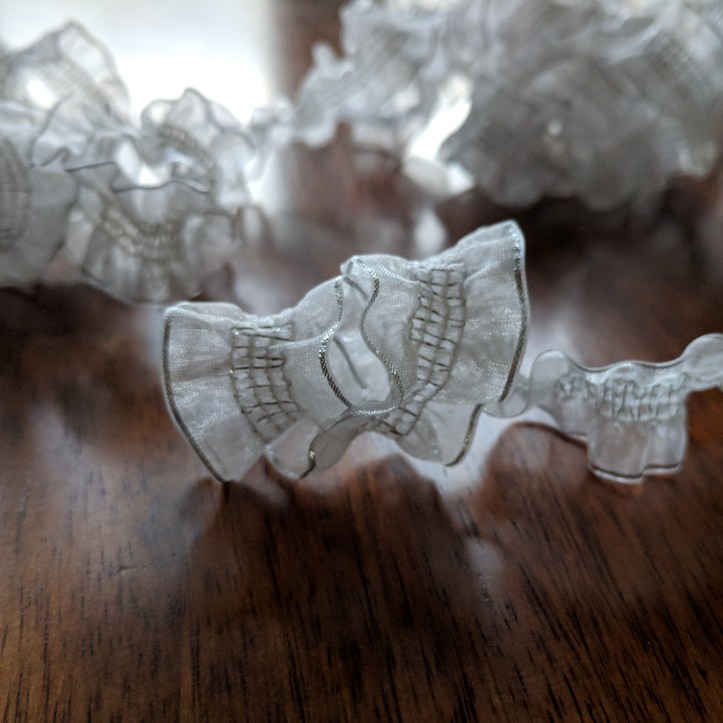
Ribbon – I chose a sort of bunchy, white and silver ribbon that gave me the impression of the jellyfish “oral arms”. (I bet you didn’t realize this was going to come with an aquatic anatomy lesson – you’re welcome.) The arms hang down the middle of the jellyfish. Again, I bought 3-4 yards, which cost $12. A thrifty alternative would be bubble wrap that has been cut into long strips.

Yarn – There are So. Many. Options. of white yarn out there, which means I was able to be very picky. I tested the “floatability” of the yarn by pulling out one end and drifting it around in the air – I could tell the other yarn buffs standing near me in the store totally understood. I ended up with an awesome angel hair yarn that was very fuzzy and looked like the tentacles of the jellyfish. I bought a skein for $10, and actually used most of it for this project.

Fairy Lights – Some jellyfish are bio-luminescent, so I added these battery-powered LED string lights in cool white from Amazon for $9. They also come in a myriad of other shades, if you want to add some colorful fun.
Total cost was right around $60, which seems like A LOT for a DIY Halloween costume. BUT if you consider the fact that I ended up winning my company’s costume contest and received a $50 gift card for first place, my total out-of-pocket expense was quite doable.
Other supplies that made things easier were scotch tape, duct tape, scissors, safety pins, and a tapestry needle. I also highly recommend you do this project with a partner – someone holding the umbrella during key parts makes it a much smoother process.
INSTRUCTIONS

1. Get all your supplies together in one place where you have space to spread out.
2. Open the umbrella. (FYI, it’s unlikely you will be able to close it again, once you add all the extra bits in later steps, so bear that in mind for storage.)
3. Add the fairy lights. I weaved the strands in and out of the metal ribs and taped them in place with scotch tape, then used duct tape to affix the on/off switches on the shaft close to the handle. I also decided to have one strand hanging down past the bottom of the umbrella handle.
4. Drape the semi-translucent fabric over the top of the umbrella and gather it together at the shaft. If possible, don’t stretch it too tight – let it billow underneath. Use 4-5 safety pins to secure it in place at the shaft – I basically pinned the fabric to itself and it held really well. Then, cut a small hole in the fabric at the top, so the cap (a.k.a. pointy bit that sticks out the top) isn’t under the fabric. You may also wish to trim the fabric below where it’s gathered if you have too much draping down.
5. Tie or secure the ribbon around the umbrella shaft right where the fabric is gathered so 3-4 “arms” hang down in the middle.

6. Using a tapestry needle, pull long strands of yarn through the fabric around the edges of the umbrella, so they hang down at random intervals and lengths. Aim to make them very long to start, and then you can trim them later on.
CONGRATULATIONS! Now you have an awesome jellyfish costume. Barooooommbaaahh! (Which is jellyfish speak for, “Huzzah!”)

Pro tip: Wear dark colored clothing under it, so the tentacles stand out, and slowly move the umbrella like it’s underwater moving with the waves.
This is a great Halloween costume for outdoor trick-or-treating, because the glowing lights make you highly visible. And if it unexpectedly starts raining, you are already standing under an umbrella!
More tips: Have your kids dress as fish, swimming around you in a school, to keep with the nautical theme. Better yet, make them their own children’s jellyfish costume with this cute child-size umbrella.
If you are dressing up in the jellyfish costume for work, consider decorating your desk to match the “under the sea” look, in order to add that extra special “I’m probably trying too hard” feel.


This was awsome but i have been trying to make my own diy jellyfish which doesn’t glow and which is not a costume please can you make a link for that and again by the way this was awsome
LikeLike